队列,英文 First In First Out 简称 FIFO,遵从先进先出的原则,与 “栈” 相反,在队列的尾部添加元素,在队列的头部删除元素,如果队列中没有元素就称为空队列。
队列对应到生活场景中有很多例子,例如,我们去火车站窗口购票总要排队,先排队的人先购票,有新的人来了则在队尾排队等待前面的完成了依次购票。另外我们的订单超时队列、活动抢购先到先得等等,队列在生活中应用很广泛。
JavaScript 数组实现队列
JavaScript 中提供的数组功能即可实现一个简单的队列,使用起来也很方便,熟悉相关 API 即可,下面我们来看下基于 JS 数组的入队、出队过程实现。
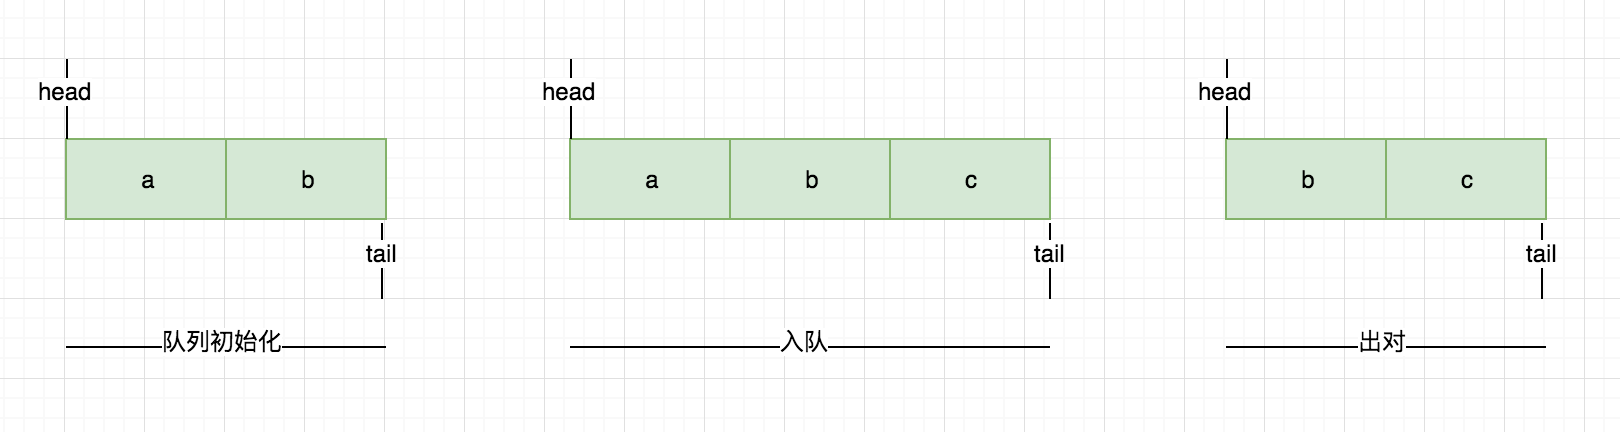
以上图片展示了队列的初始化、入队、出队过程,下面我们采用 JavaScript 原型链的方式实现。
- 初始化队列
初始化一个存储队列中元素的数据结构,如果未传入默认赋值空数组,传入需先校验类型是否正确。1
2
3
4
5
6
7
| function QueueStudy(elements) {
if (elements && !(elements instanceof Array)) {
throw new Error('必须为数组格式!');
}
this.elements = elements || [];
}
|
- 队列添加元素
实现一个 enQueue 方法,向队列添加元素,注意只能是队列尾部添加,使用 JavaScript 数组中的 push 方法。1
2
3
| QueueStudy.prototype.enQueue = function(element) {
this.elements.push(element);
}
|
- 队列移除元素
实现一个 deQueue 方法,向队列头部弹出元素,使用 JavaScript 数组中的 shift 方法。1
2
3
| QueueStudy.prototype.deQueue = function() {
return this.elements.shift();
}
|
优先队列
优先队列,元素的添加、删除是基于优先级进行的。一个现实的例子就是机场登机的顺序。头等舱和商务舱乘客的优先级要高于经济舱乘客。在有些国家,老年人和孕妇(或带小孩的妇女)登机时也享有高于其他乘客的优先级。
优先队列对应到我们生活场景中也有很多例子,例如我们去银行办理业务,一般都会排号先到的先办理,但是呢,还会有 VIP 会员优先办理,又或者去火车站窗口上购票也会有提示军人可以优先办理等等
实现步骤
核心实现继 JavaScript 数组实现队列的例子,对入队函数进行改造如下所示:
- 声明 queueElement 对象,包含了要添加到队列的元素
- 如果队列为空直接入队
- 如果找到一个比 priority 优先级大的元素,插入新元素,这里使用到了 JS 数组中的 splice 方法
- 最后如果队列中的所有元素的优先级都小于 priority,则直接在队列尾部入队
- 另外打印输出的方法也做了简单修改
代码示例
1
2
3
4
5
6
7
8
9
10
11
12
13
14
15
16
17
18
19
20
21
22
23
24
| PriorityQueue.prototype.enQueue = function(element, priority) {
const queueElement = { element, priority };
if (this.isEmpty()) {
return this.elements.push(queueElement);
}
let added = false;
for (let i=0; i < this.elements.length; i++) {
if (priority < this.elements[i]['priority']) {
added = true;
this.elements.splice(i, 0, queueElement)
break;
}
}
if (!added) {
this.elements.push(queueElement);
}
}
PriorityQueue.prototype.print = function() {
console.log(this.elements.map(item => item.element).join(' | '));
}
|
运行测试
1
2
3
4
5
6
7
8
9
10
| const queue = new PriorityQueue();
queue.enQueue('普通会员1', 5);
queue.enQueue('普通会员2', 10);
queue.print() // 普通会员1 | 普通会员2
queue.enQueue('VIP会员1', 3);
queue.print() // VIP会员1 | 普通会员1 | 普通会员2
queue.enQueue('VIP会员2', 3);
queue.print() // VIP会员1 | VIP会员2 | 普通会员1 | 普通会员2
queue.deQueue();
queue.print() // VIP会员2 | 普通会员1 | 普通会员2
|
图例展示
下面以图例的形式展示以上优先队列程序的运行过程
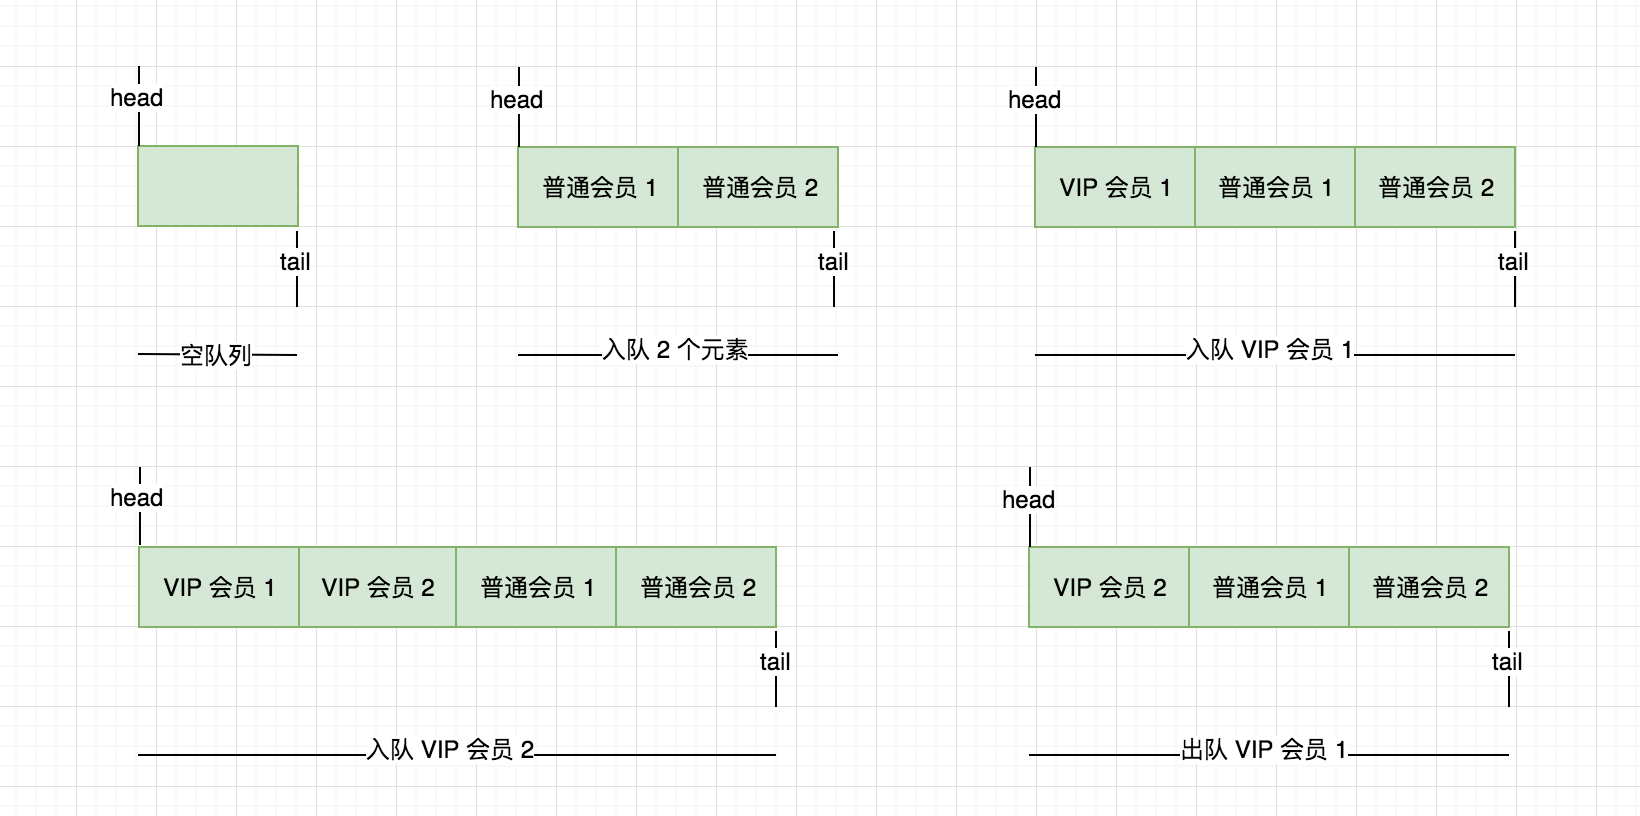
以上是将优先级最小的元素放置于队列前面,称之为最小优先队列,最大优先队列的实现则反之。源码参见 https://github.com/Q-Angelo/project-training/tree/master/algorithm/queue-priority.js
循环队列
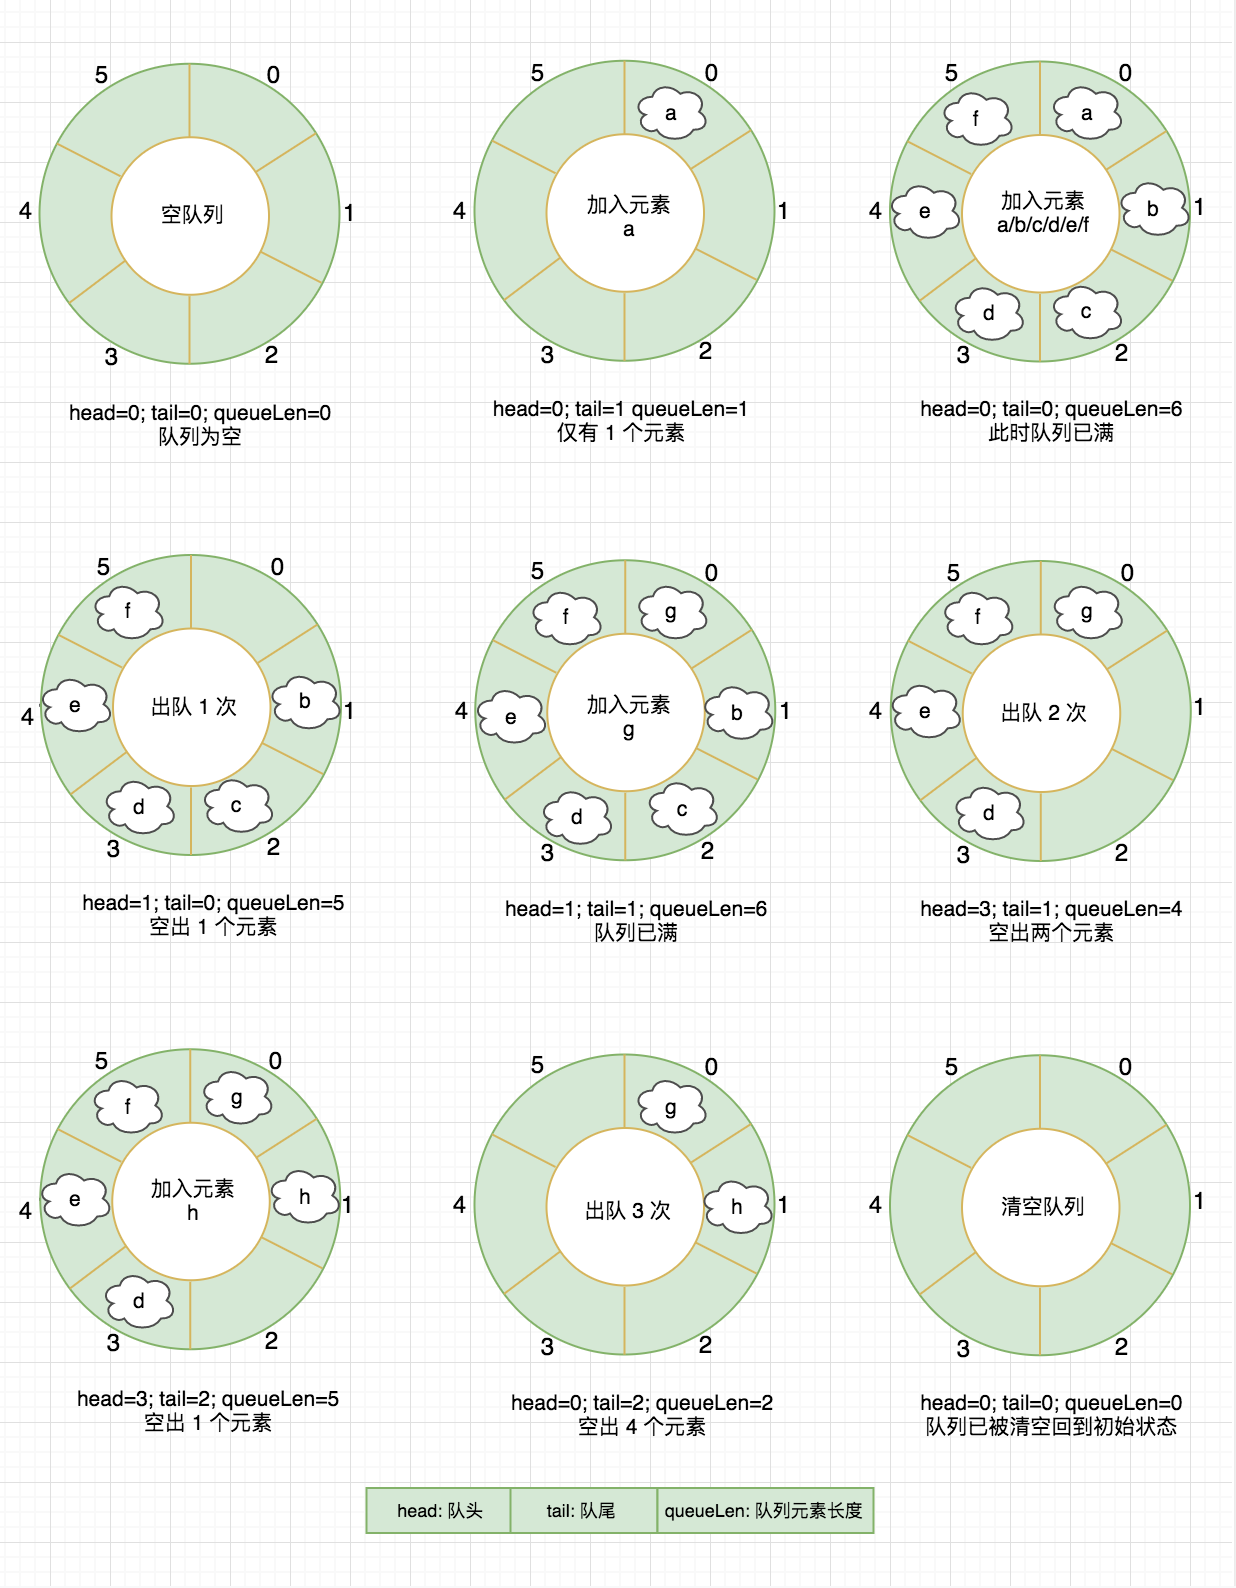
循环队列有些地方也称之为环形队列,其本身是一种环形结构的队列,相较于普通队列有个好处是第一个元素出队之后,剩下元素无需依次向前移位,充分利用了向量空间,在以下介绍中给出了完整的实现过程。
在设计环形队列时即可顺时针也可逆时针两个方向进行实现,在入队时可根据 (tail % capacity) 规则,进行队尾添加元素,tail 表示队尾的指针,capacity 表示容量,出队同样以(head % capacity)规则操作,head 表示队头指针,下面以长度为 6 的队列进行图文形式说明下实现过程。
ES6 实现循环队列
以下采用 EcameScript 6 的 Class 写法,实现一个环形队列,需要做哪些点呢?以下列出需要实现的功能点:
- 创建队列,初始化队列空间
- 检查队列是否为空
- 检查队列是否溢出
- 入队
- 出队
- 队列长度
- 清空队列
- 销毁队列,内存空间也将释放
- 队列遍历输出
1
2
3
4
5
6
7
8
9
10
11
12
13
14
15
16
17
18
19
20
21
22
23
24
25
26
27
28
29
30
31
32
33
34
35
36
37
38
39
40
41
42
43
44
45
46
47
48
49
50
51
52
53
54
55
56
57
58
59
60
61
62
63
64
65
66
67
68
69
70
71
72
73
74
75
76
77
78
79
80
81
82
83
84
85
86
87
88
89
90
91
92
93
94
95
96
| const Init = Symbol('QueueStudy#Init');
class QueueStudy {
constructor (capacity) {
if (!capacity) {
throw new Error('The capacity field is required!');
}
this.capacity = capacity; // 初始化容量
this[Init]();
}
/**
* 清空队列,内存保留
*/
clear() {
this[Init]()
}
[Init]() {
this.queue = new Array(this.capacity); // 初始化队列内存空间
this.queueLen = 0; // 初始化队列元素
this.head = 0; // 队头
this.tail = 0; // 尾部
}
/**
* 队列是否为空
*/
isEmpty() {
return this.queueLen === 0 ? true : false;
}
/**
* 队列是否溢出
*/
isOverflow() {
return this.queueLen === this.capacity
}
/**
* 入队
*/
enQueue(element) {
if (this.isOverflow()) {
return false;
}
this.queue[this.tail] = element;
this.tail++;
this.tail = this.tail % this.capacity;
this.queueLen++;
return true;
}
/**
* 出队
*/
deQueue() {
if (this.isEmpty()) {
throw new Error('队列为空');
} else {
const element = this.queue[this.head];
this.head++; // 队头位置移动
this.head = this.head % this.capacity;
this.queueLen--;
return element;
}
}
/**
* 队列长度
*/
len() {
return this.queueLen;
}
/**
* 销毁队列,内存回收
*/
destroy() {
this.queue = null;
}
/**
* 队列元素遍历
*/
traversing() {
console.log('------------traversing start------------');
for (let i=this.head; i<this.queueLen + this.head; i++) {
console.log(this.queue[i % this.capacity]);
}
console.log('------------traversing end------------\n');
}
}
|
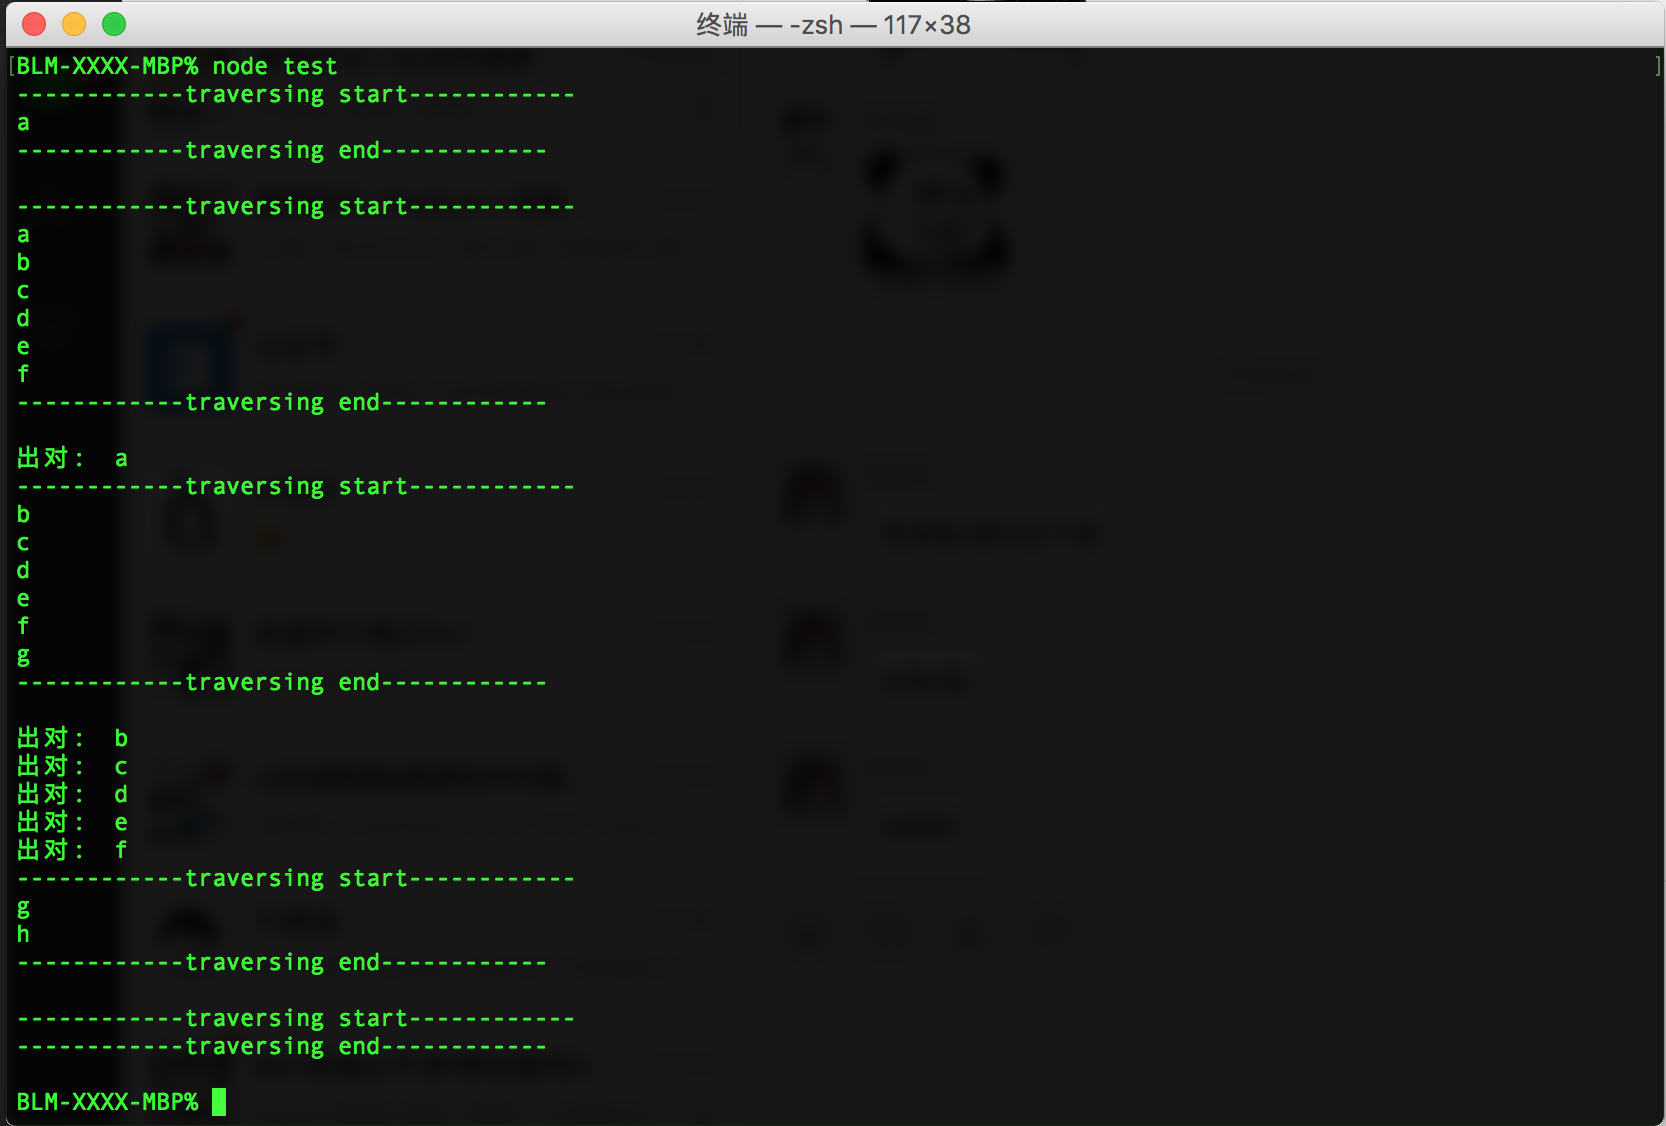
运行测试
1
2
3
4
5
6
7
8
9
10
11
12
13
14
15
16
17
18
19
20
21
22
| const q1 = new QueueStudy(6);
q1.enQueue('a');
q1.traversing();
q1.enQueue('b');
q1.enQueue('c');
q1.enQueue('d');
q1.enQueue('e');
q1.enQueue('f');
q1.traversing();
console.log('出队: ', q1.deQueue());
q1.enQueue('g');
q1.traversing();
console.log('出队: ', q1.deQueue());
console.log('出队: ', q1.deQueue());
q1.enQueue('h');
console.log('出队: ', q1.deQueue());
console.log('出队: ', q1.deQueue());
console.log('出队: ', q1.deQueue());
q1.traversing();
q1.clear();
q1.traversing();
|
源码参见 https://github.com/Q-Angelo/project-training/tree/master/algorithm/queue-ring.js
推荐我在学习数据结构中看的两本书 学习JavaScript数据结构与算法(第2版)、图解数据结构使用 Python